
About FuturFaith
Course
Resources
Close Menu
Close Menu
Deep Dive
From crafting ceremony scripts to managing client documents, this guide will streamline your workflow as an officiant.

In today's ceremony industry, mastering word processing tools like Microsoft Word and Google Docs is crucial.
Whether you're drafting scripts, creating receipts, or preparing client materials, these tools make everything from editing to sharing documents efficient and professional.
This free lesson will get you started on Microsoft Word and Google Docs, and we'll go into some basic but essential word processing skills that will help you immensely on your officiant journey.
Word processing involves using computer software to write, edit, and format text. Unlike traditional typewriters, word processing allows you to correct mistakes, apply various formatting options, and share your documents effortlessly. It's a time-saving, user-friendly way to keep your work organised and professional.
Both Microsoft Word and Google Docs are powerful tools for creating clean, easily shareable documents. Word works seamlessly with other Microsoft programs like Excel and PowerPoint, while Google Docs excels in real-time collaboration and automatic saving, thanks to its cloud-based nature (meaning everything is saved online and not on your device).
At FuturFaith, we exclusively use Microsoft Word, but Google Docs is a viable free alternative.
Click here to download Microsoft Word and get started.
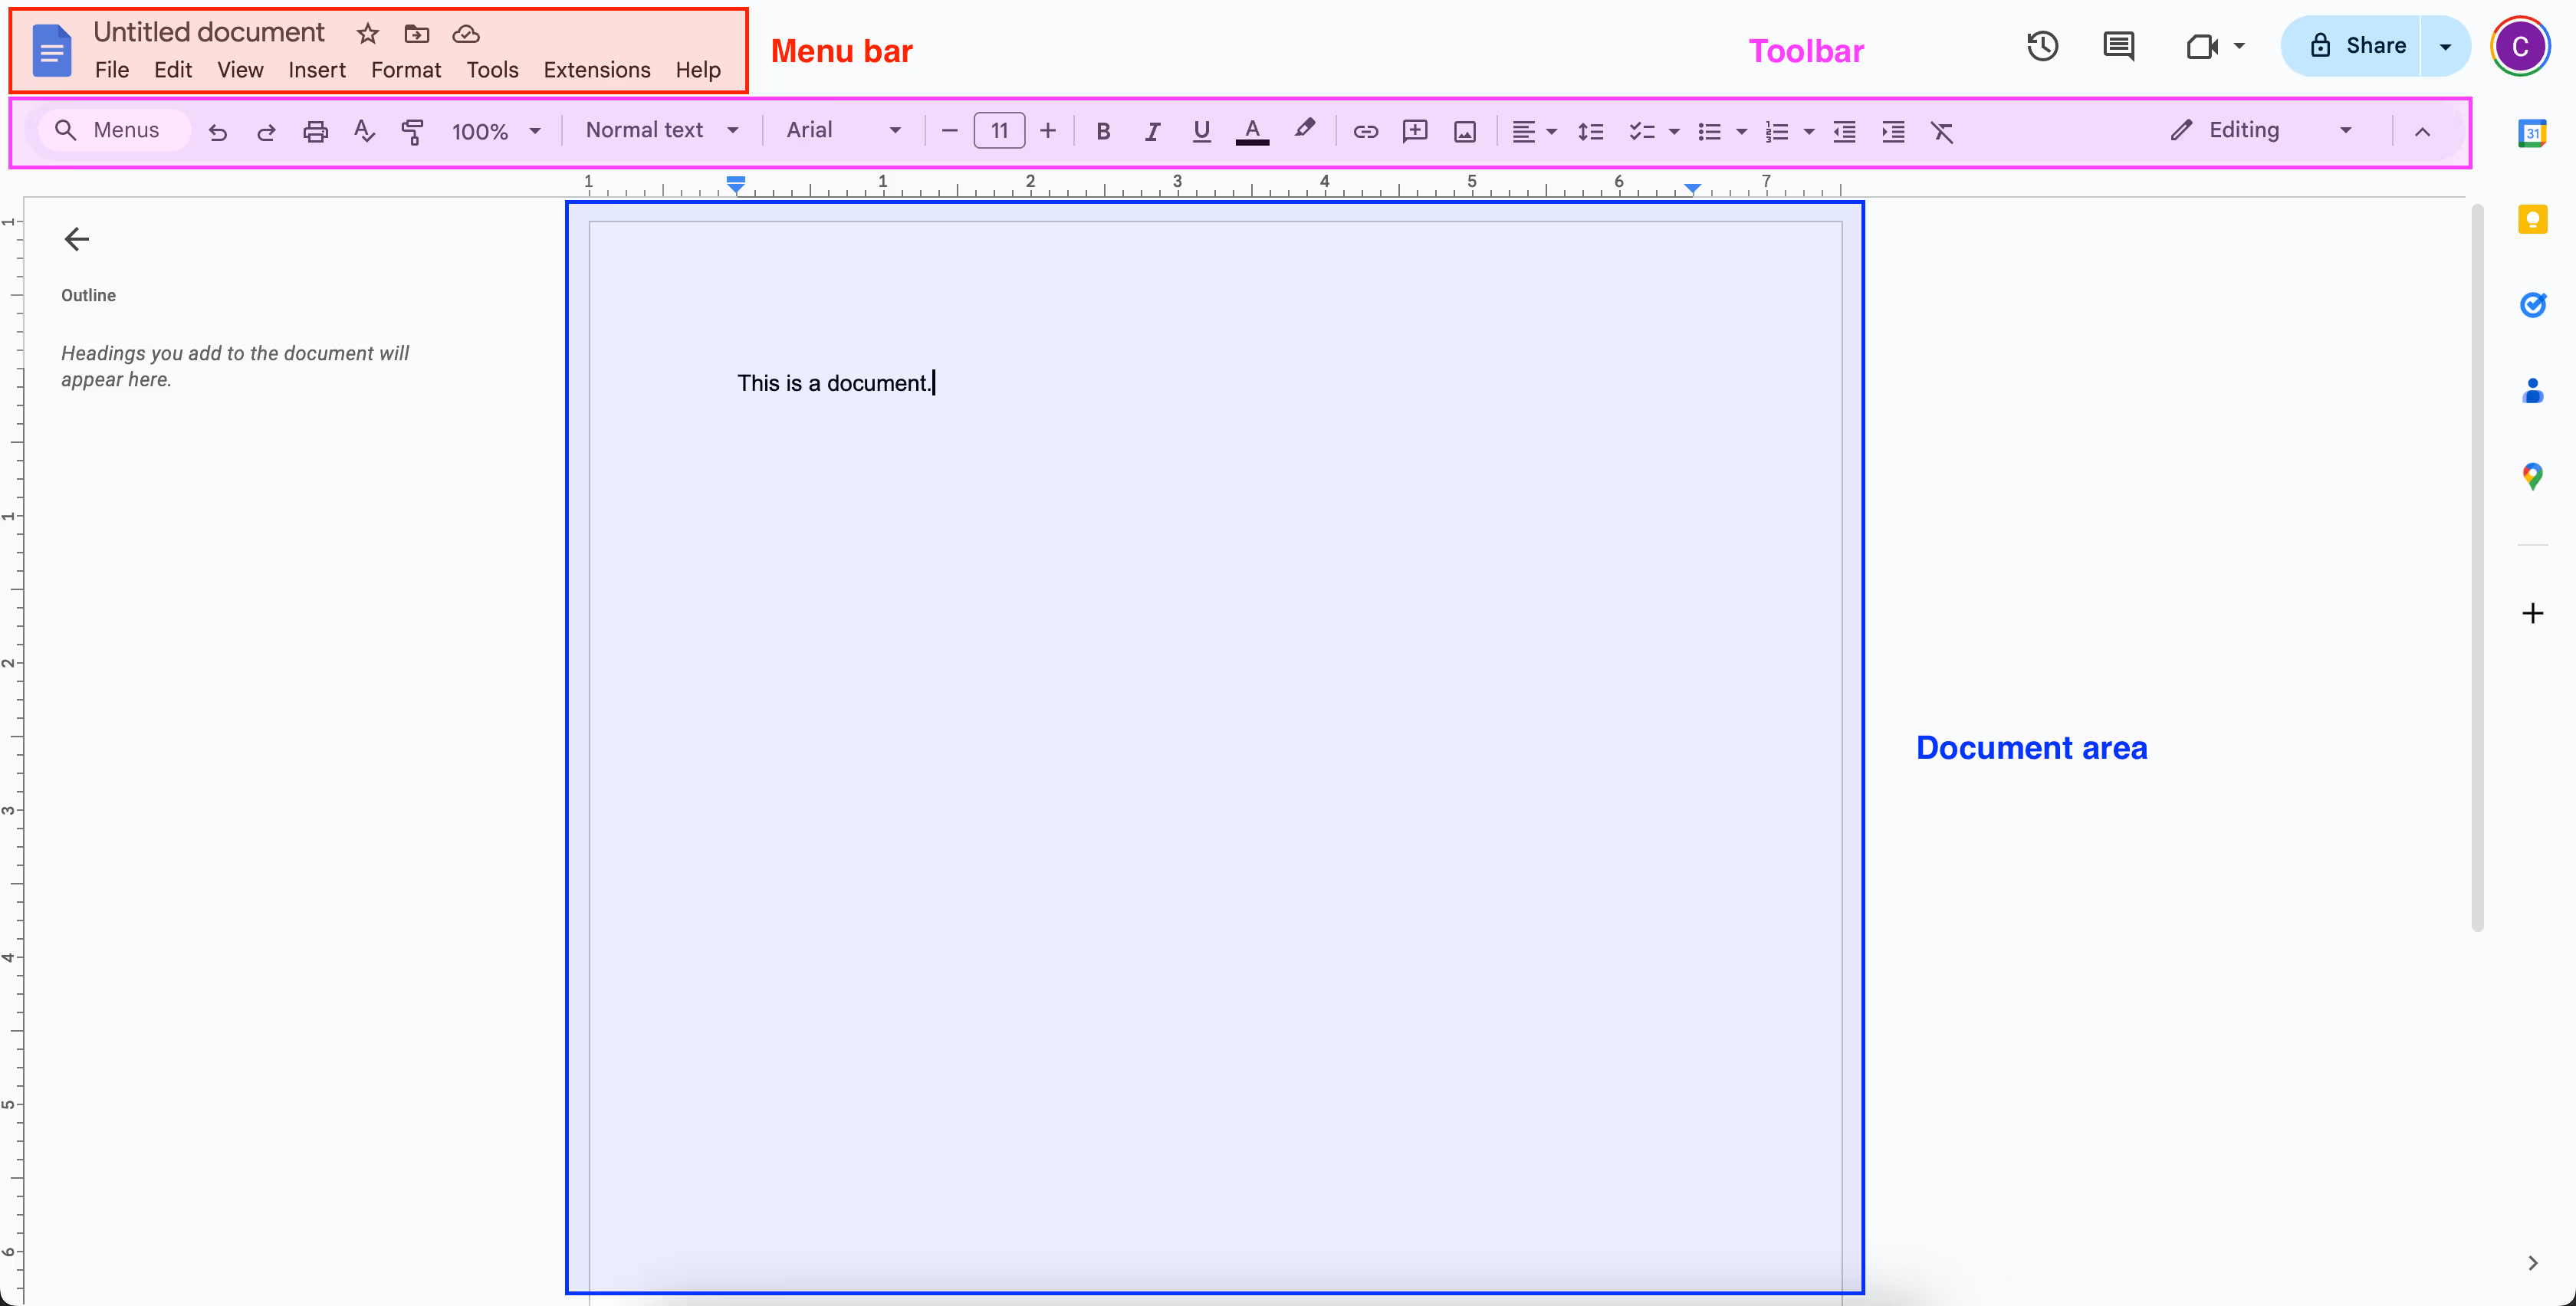
To begin using Microsoft Word, open the program and create a new document. The interface is divided into various sections:

To start creating, click in the document area, type a title, and format it using the Ribbon's commands. You can make your text bold, change its font size or colour, and save your document as you go. Additionally, you can insert pictures, tables, and other elements to enhance your document.
Google Docs offers a similar experience, but entirely online. Simply go to docs.google.com, sign in, and create a new document. The layout is straightforward:
Much like Word, you can format text, insert images or tables, and adjust document settings. Google Docs saves your work automatically, so you never have to worry about losing progress.
Both Microsoft Word and Google Docs offer flexible formatting options for text and paragraphs, helping you make your documents more polished and visually appealing. You can:
By playing around with these features, you can create documents that are both functional and aesthetically pleasing.
Let's try and format some text within Microsoft Word.
To format text, select it by clicking and dragging your mouse over it. It should look like this:

Use the commands in the Ribbon to change the font, size, colour, and alignment. For example, to make text bold, click the "B" button in the Home tab. Change the font by clicking the drop-down arrow next to the font box (where it says 'Aptos' in the photo below).
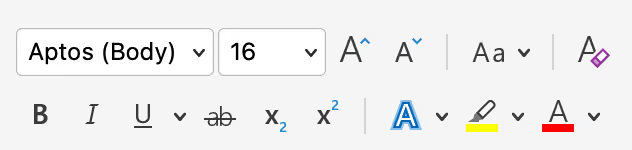
You can also change text colour by clicking the "A" button with a colour bar in the Home tab. In the photo above, that's the "A" with a red underline. To highlight text, you can click the highlight button, which looks like a marker.
Next, let's figure out how to format our paragraphs and align our text correctly.
To format paragraphs, click and place your cursor anywhere in the paragraph you want to change. In the Home tab, use the alignment buttons to align text to the left, centre, right, or justify (which means that the text will try to stretch horizontally to fill the width of the page. Text alignment settings are highlighted in red below.

To change line spacing, click the line spacing button, which has up and down arrows next to lines of text. This button is highlighted in blue above.
At FuturFaith, we usually set our line spacing to 1.5 and our text alignment will always be left.
Adding images and graphics can significantly enhance the appeal of your documents. In both programs, you can easily insert pictures, resize them, and adjust how they interact with your text.
This is especially useful for adding your officiant logo at the top of your ceremony scripts.
In Word, you'll find the Insert tab, where you can choose to add images from your device or the internet.

Google Docs offers a similar function, with the ability to insert images from Google Drive, your computer, or even search the web directly.
Organising information in a table can make your documents clearer and more professional. Both Word and Docs allow you to insert tables, format their rows and columns, and adjust their overall style. In Word, this is done through the Insert tab, while in Docs, you use the Insert menu.

Once your table is in place, you can edit it by merging cells together, adjusting border colours, and aligning text to ensure everything looks neat and professional.
To take your documents to the next level, you can use advanced features like headers, footers, and page numbers. These elements help create well-organised, professional documents, especially for longer files like ceremony scripts.
In Microsoft Word, headers and footers are added via the Insert tab, while Google Docs offers similar options under the Insert menu. You can also customise page numbers to appear in different locations throughout your document.
We'll focus on Microsoft Word and show you how to handle headers, footers and page numbers.
To add a header, go to the Insert tab again, like we did for adding photos or table.

Click on the Header button, where you'll be able to choose a style from the drop-down menu, and it will appear at the top of your document. Type your text, like the document title or your name. When you’re done, click anywhere in the main document area to exit the header settings.
![Text editor with highlighted text '[Type here]' above a line with a blue 'Header' label followed by grey text 'This is some text'.](https://cdn.prod.website-files.com/60e4403ad39875269aec11ac/66fac9dc0f216c672eacb9b6_Screenshot%202024-09-30%20at%2011.54.49.avif)
Next, let's add a footer. In the insert tab again, we can click the Footer button. Once more, we can choose a style from the drop-down menu, and it will appear at the bottom of the document. Type your text here, like your brand name or the name of your couple, in the case of a wedding. When you’re done, click in the main document area again to exit.

To add page numbers, go back to the Insert tab and click the Page Number button this time. You'll see a pop-up that looks like this:

Choose a position, like top or bottom of the page (we recommend placing your page numbers on the top right). Page numbers will then be added automatically to each page.
When your document is ready to share, you can print or export it in various formats. Microsoft Word allows you to save documents as PDFs, Word files, or many other file types, while Google Docs can be exported as a Word file, PDF, or plain text.
The main file types we'll be dealing with as officiants are Word files or PDF files. The difference between these two file types is that a Word file can be opened and edited in Microsoft Word or Google Docs, whereas a PDF is final and can only be viewed, not edited.
We will always save our ceremony scripts, etc. as Word files so that we can go back and make edits at our couple/client's requests. When we're sending our scripts or other files to anybody else though, we'll send them as PDF files, as these look best for viewing.
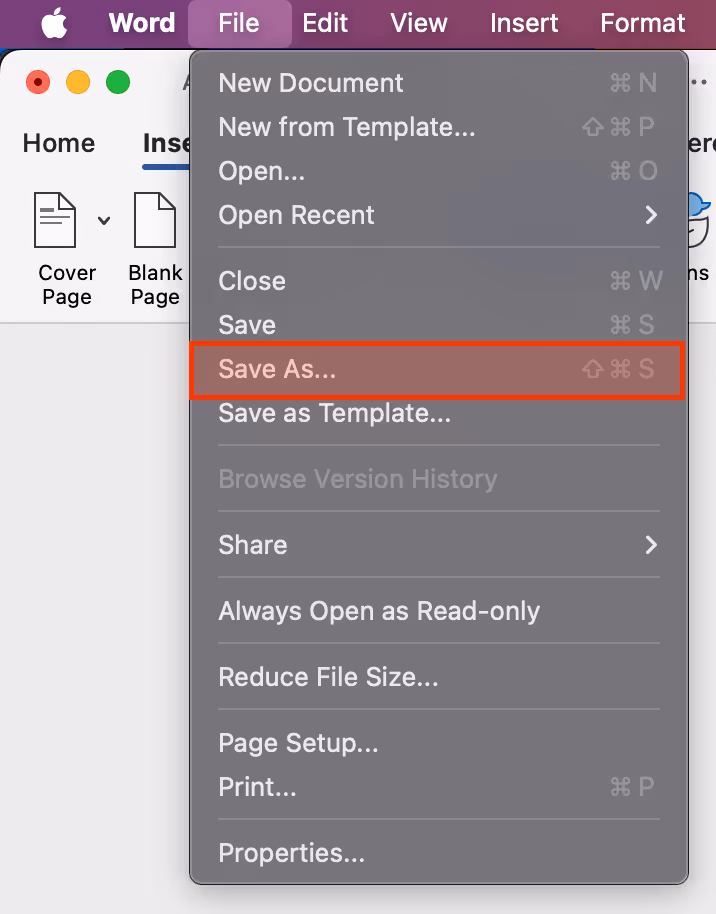
To export your document, let's head over to the File tab, where we'll click on 'Save As'. This photo is taken from an Apple Macbook, but will look similar on a Windows computer.
Choose where to save your file, then select the file type from the drop-down menu. Save it as a PDF, Word template, or other formats. For our officiant purposes, we'll always save once as a Word file (Abbreviated as '.docx'), and once as a PDF file.

To print your document, click the File tab again, then on 'Print'. You’ll see a preview and various print settings. Make sure your printer is selected, and then you may choose the number of copies, select specific pages, change orientation and paper size, and so on. When ready, simply click 'Print'.

Before sending your document out, it's important to review and finalise it. Both Word and Docs offer built-in tools for checking spelling and grammar. You can also track changes, add comments, and protect your document from further edits.
To check for spelling and grammar errors, go to the Review tab and click Spelling & Grammar.

Microsoft Word and Google Docs alike will highlight errors found within your document, whether they're typos or formatting mistakes. Review each one and choose to correct, ignore, or add to the dictionary (useful for people's names that get flagged as errors).
This quick guide only scratches the surface of what's possible when you master Microsoft Word/Google Docs.
Along with a brand new module coming soon on word processing, our online course is filled with useful information on ceremony layout, titles, saving and sharing ceremony scripts, and much more.
If you're interested in becoming a confident, modern-day officiant, head to our Path to Ministry page to find out more, or you can apply now.
.svg)
All lessons
Enjoyed this lesson? Find more to read below or visit our Help Centre.

See where your Path to Ministry takes you.
Apply now© 2024 FuturFaith Ministry®.